I spent quite a while trying to save time on getting a nice Clojure development setup working on my Debian Squeeze box. As it turned out I should have spent some extra moments doing the right thing rather than hoping a quick hack would work. Here's my notes on how to get VimClojure working on Squeeze. Note that I’d installed the debs from the usual repositories first, which installed libasm3-java. You may need to aptitude install that. Here’s a screenshot of the finished product.
The Objective
My objective was to have a nice REPL within a window in my Vim instance. I also wanted decent syntax highlighting which is more of a big deal when you're learning as it shows you where you’ve ballesed up the syntax. VimClojure seemed to do this. It works by running a java server (called NailGun) which evaluates the code you send it using a client program called variously ng, the NailGun client or the VimClojure client. You need all those bits installed.
Clojure Setup — Don't use the default Debian Clojure
I don't know why, but the 1.1 verdsion of Clojure that ships with Squeeze doesn't play nicely with the VimClojure nailgun server. Also note that you'll want a >1.5 java virtual machine. I’m using 1.6.0_26. I installed Clojure 1.2.1 and the 1.2 version of Clojure contrib. I did that by wgetting the zip files provided on the Clojure download page and unzipping them in /usr/share/java. then moved the actual jar files up from the folder hierarchy, meaning my $CLASSPATH would be a little less cluttered. To save space I didn't include the full responses in the clojure contrib install process.
$ cd /usr/share/java
$ $ sudo wget https://github.com/downloads/clojure/clojure/clojure-1.2.1.zip
--2012-01-15 19:09:15--  https://github.com/downloads/clojure/clojure/clojure-1.2.1.zip
Resolving github.com... 207.97.227.239
Connecting to github.com|207.97.227.239|:443... connected.
HTTP request sent, awaiting response... 302 Found
Location: http://cloud.github.com/downloads/clojure/clojure/clojure-1.2.1.zip [following]
--2012-01-15 19:09:16--  http://cloud.github.com/downloads/clojure/clojure/clojure-1.2.1.zip
Resolving cloud.github.com... 205.251.205.149, 205.251.205.176, 205.251.205.244, ...
Connecting to cloud.github.com|205.251.205.149|:80... connected.
HTTP request sent, awaiting response... 200 OK
Length: 3594149 (3.4M) [application/zip]
Saving to: `clojure-1.2.1.zip'

100%[===================================================================================================================================================================================================>] 3,594,149   1.05M/s   in 3.4s

2012-01-15 19:09:19 (1.02 MB/s) - `clojure-1.2.1.zip' saved [3594149/3594149]
$ sudo unzip clojure-1.2.1.zip
Archive:  clojure-1.2.1.zip
   creating: clojure-1.2.1/
   creating: clojure-1.2.1/doc/
…
   inflating: clojure-1.2.1/test/clojure/test_clojure/vars.clj
   inflating: clojure-1.2.1/test/clojure/test_clojure/vectors.clj
$ sudo mv clojure-1.2.1/clojure.jar .
$ sudo chmod 755 clojure.jar
$ sudo wget http://github.com/downloads/clojure/clojure-contrib/clojure-contrib-1.2.0.zip
$ sudo unzip clojure-contrib-1.2.0.zip
$ sudo mv clojure-contrib-1.2.0/target/clojure-contrib-1.2.0.jar .
$ sudo chmod 755 clojure-contrib-1.2.0.jar
Add the jars to your $CLASSPATH
An easy step to forget; later we'll add the $CLASSPATH to ~/.bashrc so its set when we log in. $ export CLASSPATH=/usr/share/java/clojure.jar:/usr/share/java/clojure-contrib-1.2.0.jar:$CLASSPATHIf everything’s right we should be able to start Clojure's REPL thus:$ java clojure.main
Clojure 1.2.1
user=>
Set up the VimClojure NailGun server
The setup process is works the same as installing Clojure itself. We grab a jar, install it, and add it to our $CLASSPATH.$cd /usr/share/java
$ sudo wget http://clojars.org/repo/vimclojure/server/2.2.0/server-2.2.0.jar
--2012-01-15 19:36:04-- http://clojars.org/repo/vimclojure/server/2.2.0/server-2.2.0.jar
Resolving clojars.org... 173.230.139.200
Connecting to clojars.org|173.230.139.200|:80... connected.
HTTP request sent, awaiting response... 200 OK
Length: 49459 (48K) [application/java-archive]
Saving to: `server-2.2.0.jar'
100%[===================================================================================================================================================================================================>] 49,459 131K/s in 0.4s
2012-01-15 19:36:04 (131 KB/s) - `server-2.2.0.jar' saved [49459/49459]
$ export CLASSPATH=/usr/share/java/server-2.2.0.jar:$CLASSPATH
We verify that it is working as expected. Press ctrl-c to kill it.$ java vimclojure.nailgun.NGServer
NGServer started on all interfaces, port 2113.
^Cvimclojure.nailgun.builtins.NGAlias: 0/0
vimclojure.nailgun.builtins.NGClasspath: 0/0
vimclojure.nailgun.builtins.NGServerStats: 0/0
vimclojure.nailgun.builtins.NGStop: 0/0
vimclojure.nailgun.builtins.NGVersion: 0/0
NGServer shut down.
Compile the VimClojure NailGun client
You have to build this by hand. I’m hoping that you might have used make before, but it should be straightforward. This worked for me. NB: I have lax permissions on /usr/local/src cos I like to build as me rather than root. You may need to sudo these commands.
$ cd /usr/local/src
$ wget http://kotka.de/projects/vimclojure/vimclojure-nailgun-client-2.2.0.zip
--2012-01-15 19:21:49--  http://kotka.de/projects/vimclojure/vimclojure-nailgun-client-2.2.0.zip
Resolving kotka.de... 62.75.247.120
Connecting to kotka.de|62.75.247.120|:80... connected.
HTTP request sent, awaiting response... 200 OK
Length: 13118 (13K) [application/zip]
Saving to: `vimclojure-nailgun-client-2.2.0.zip'

100%[===================================================================================================================================================================================================>] 13,118      --.-K/s   in 0.09s

2012-01-15 19:21:49 (140 KB/s) - `vimclojure-nailgun-client-2.2.0.zip' saved [13118/13118]

$ unzip vimclojure-nailgun-client-2.2.0.zip
Archive:  vimclojure-nailgun-client-2.2.0.zip
   creating: vimclojure-nailgun-client/
  inflating: vimclojure-nailgun-client/Makefile
  inflating: vimclojure-nailgun-client/ng.exe
   creating: vimclojure-nailgun-client/ngclient/
  inflating: vimclojure-nailgun-client/ngclient/ng.c
$ cd vimclojure-nailgun-client/
$ make
Building ng client.  To build a Windows binary, type 'make ng.exe'
gcc -Wall -pedantic -s -O3  -o ng ngclient/ng.c
$ sudo mv ng /usr/local/bin
Now you should be able to run the ng command
$ ng
Usage: ng class [--nailgun-options] [args]
          (to execute a class)
   or: ng alias [--nailgun-options] [args]
          (to execute an aliased class)
   or: alias [--nailgun-options] [args]
          (to execute an aliased class, where "alias"
           is both the alias for the class and a symbolic
           link to the ng client)

where options include:
   --nailgun-D<name>=<value>   set/override a client environment variable
   --nailgun-version           print product version and exit
   --nailgun-showversion       print product version and continue
   --nailgun-server            to specify the address of the nailgun server
                               (default is localhost)
   --nailgun-port              to specify the port of the nailgun server
                               (default is 2113)
   --nailgun-help              print this message and exit
Test that the client and server talk to each other
To test this is working the easiest thing which has been suggested is to bosh together a trivial java class and throw it at the server. The process works like this.
- Add your working directory to the $CLASSPATH
- Write your code (or copypaste mine)
- Compile it
- Start the server
- Use the client to throw the new class to the server
Easy, right? Here is a listing of a very simple hello world type program, below are the instructions to complete the steps above.
HiWorld.java
cat test/HiWorld.java
package test;

public class  HiWorld {
        public static void main(String[] args) {
                        System.out.println("Hello NailGun!");
        }
      }
Note that I have included this in a package called test, you should save this file in a directory called /path/to/working_directory/test.
The actual tests
We first write and compile our class, and make sure the classpath is correct.$ export CLASSPATH=/home/charlieharvey/code/:$CLASSPATH
$ pwd
/home/charlieharvey/code/test
$ ls
HiWorld.java
$ javac HiWorld.java
$ java test.HiWorld
Hello NailGun!
$
The next step requires another terminal window to be open, or you can just background the server with & like I have done here. When the server goes into the background, you need to press enter to get your prompt back. When you foreground it with fg, after the test, you can kill it with CTRL-C in the usual way.
$ java vimclojure.nailgun.NGServer &
[1] 8974
$ NGServer started on all interfaces, port 2113.[ENTER]
$ ng test.HiWorld
Hello NailGun!
$ $ fg
java vimclojure.nailgun.NGServer
^Ctest.HiWorld: 1/0
vimclojure.nailgun.builtins.NGAlias: 0/0
vimclojure.nailgun.builtins.NGClasspath: 0/0
vimclojure.nailgun.builtins.NGServerStats: 0/0
vimclojure.nailgun.builtins.NGStop: 0/0
vimclojure.nailgun.builtins.NGVersion: 0/0
NGServer shut down.
Install the Vimclojure plugin
When I was writing this up I almost forgot to include this rather important step. Doh! Some folks prefer to download with a GUI so they can control what files get installed.$ cd ~/.vim
$ unzip vimclojure.zip
Archive: vimclojure.zip
creating: autoload/
inflating: autoload/vimclojure.vim
creating: autoload/vimclojure/
inflating: autoload/vimclojure/util.vim
creating: bin/
inflating: bin/clj
inflating: bin/clj.bat
inflating: bin/ng-server
inflating: bin/ng-server.bat
creating: doc/
inflating: doc/clojure.txt
creating: ftdetect/
inflating: ftdetect/clojure.vim
creating: ftplugin/
inflating: ftplugin/clojure.vim
creating: ftplugin/clojure/
inflating: ftplugin/clojure/completions-clojure.core.txt
inflating: ftplugin/clojure/completions-clojure.data.txt
inflating: ftplugin/clojure/completions-clojure.inspector.txt
inflating: ftplugin/clojure/completions-clojure.java.browse.txt
inflating: ftplugin/clojure/completions-clojure.java.io.txt
inflating: ftplugin/clojure/completions-clojure.java.javadoc.txt
inflating: ftplugin/clojure/completions-clojure.java.shell.txt
inflating: ftplugin/clojure/completions-clojure.main.txt
inflating: ftplugin/clojure/completions-clojure.pprint.txt
inflating: ftplugin/clojure/completions-clojure.repl.txt
inflating: ftplugin/clojure/completions-clojure.set.txt
inflating: ftplugin/clojure/completions-clojure.stacktrace.txt
inflating: ftplugin/clojure/completions-clojure.string.txt
inflating: ftplugin/clojure/completions-clojure.template.txt
inflating: ftplugin/clojure/completions-clojure.test.junit.txt
inflating: ftplugin/clojure/completions-clojure.test.tap.txt
inflating: ftplugin/clojure/completions-clojure.test.txt
inflating: ftplugin/clojure/completions-clojure.walk.txt
inflating: ftplugin/clojure/completions-clojure.xml.txt
inflating: ftplugin/clojure/completions-clojure.zip.txt
creating: indent/
inflating: indent/clojure.vim
creating: plugin/
inflating: plugin/clojure.vim
creating: syntax/
inflating: syntax/clojure.vim
inflating: LICENSE.txt
inflating: README.markdown
Configure VimClojure in your .vimrc file
After that lot, actually enabling VimClojure is a bit of a breeze, cut and paste the following into your ~/.vimrc file."""""""" Vimclojure
let vimclojure#HighlightBuiltins = 1
let vimclojure#HighlightContrib = 1
let vimclojure#ParenRainbow = 1
let vimclojure#WantNailgun = 1
let vimclojure#NailgunClient = "/usr/local/bin/ng"
With that we should be good to go. Let's have a quick play with the VimClojure functionality.
Using VimClojure, the first ten minutes
I borrowed these ideas from this post by Meikel Brandmeyer. The credit is his. The mistakes are mine entirely!
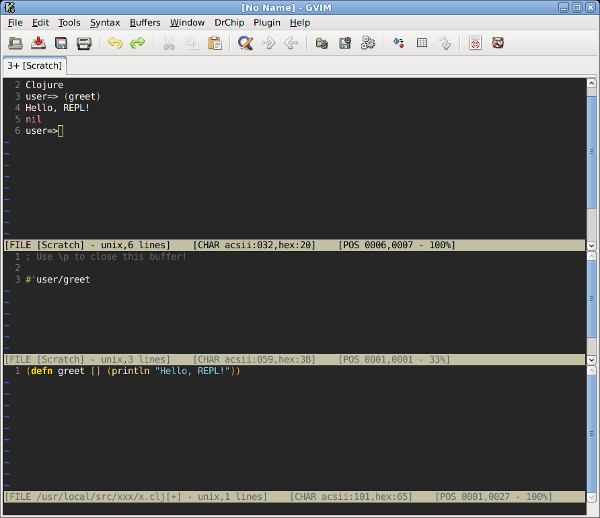
We'll demonstrate stuff using another helloworld program, this time a clojure function called greet. Don't forget to start the NailGun server in a terminal somewherejava vimclojure.nailgun.NGServer &
[1] 8974
$ NGServer started on all interfaces, port 2113.[ENTER]
- Now, fire up Vim or Gvim. It'll read the config from your .vimrc and moan about any typos you made.
- Type in a function
(defn greet [] (println "Hello, REPL!")) - Fire up the REPL window with \sr. It pops up at the top of the screen. You probably need to press ESC first if it doesn’t.
- Use CTRL-W CTRL-W to get back in the window your function is in.
- Get your cursor inside your function and evaluate it by using \et. Again you may need to press ESC first.
- The scratch window opens saying
; Use \p to close this buffer!

#'user/greet
I guess you could close it if you needed the space. It doesn't seem to do any harm though. - Now get into the REPL window with a quick CTRL-W CTRL-W
- After user start typing (gre and complete it with CTRL-N (sometimes CTRL-X CTRL-O) close the bracket and press ENTER and you should see this.
Clojure user=> (greet) Hello, REPL! nil user=> - There’s more tips on how to use VimClojure in the docs or the VimClojure README.
What I learned
Setting up a REPL can be something of a faff, but its sort of fun having it built into Vim. I like the rainbow parentheses feature and I’m wondering when they will come to other Lisps. Maybe they have.
Well that's it for this installment. Next time, on to actually learning Clojure. This better be good!